

I love making things from scratch. We try to feed our children whole foods, locally grown and organic whenever possible.
While we were doing the GAPS diet, I loved making raw milk yogurt and kefir for the kids (neither my hubby nor myself can tolerate dairy other than ghee and butter). Yogurt was one of the things I had down to an art and made a perfect snack, quick breakfast, or addition to smoothies.
Unfortunately, both of our older children developed rashes and some gut issues that only resolved when we eliminated dairy entirely.
So, now it seems that our entire family is dairy free. Trying to incorporate probiotic rich foods can be slightly tricky when you have to avoid things like yogurt, kefir, and whey.
Luckily, we discovered cultured almond and coconut milk yogurt and kefir at our local natural health store! This seemed great at first, but trying to feed a family of 5 breakfasts on a single container of this just wasn’t cutting it for my bottomless pit kids and dairy free yogurts can be quite expensive!
I decided to try my hand at making homemade almond milk yogurt. I wish that I could say I made this initial batch with homemade almond milk too, but we haven’t been able to source raw almonds locally so I used a store-bought, unsweetened variety instead.
Ingredient Options:
This recipe is ultra simple and requires just four ingredients that you may already have on hand! It is also totally customizable so you can really make it your own.
The first ingredient you’ll need is 4 cups (1 quart) of unsweetened “alternative” milk such as almond, coconut, etc. OR homemade milk. For a thicker yogurt, I recommend using canned coconut milk. Just be careful to select an unsweetened milk, otherwise you may end up with a VERY sweet yogurt after adding in your sweetener of choice.
Ingredient number two is your sweetener of choice, and this is an optional ingredient. If you are following a ketogenic or low-carb diet, then feel free to use stevia or another sweetener of choice. I’ve had good results using low-glycemic coconut sugar, maple syrup, or honey.
Ingredients three and four are your culture, and your thickener.
Culturing Options:
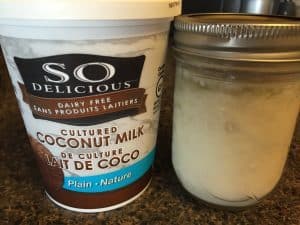
In order to “culture” the yogurt, you have to add live bacteria. You can do this buy adding one package of vegan yogurt starter, 1-2 tsp of powdered probiotics (or 1-2 capsules opened and sprinkled into the milk after boiling), or 1/3 cup of unsweetened non-dairy yogurt made with live bacterial cultures.
I chose the latter option and used the So Delicious variety of cultured coconut milk yogurt.
As you can see in the picture of my finished product, homemade vegan yogurts can be thinner than regular yogurt or even store bought dairy-free yogurts.
Thickening Options:
If you prefer a thicker, spoonable yogurt, you have several options for thickeners as outlined below.
These options can be added to 1/2 cup of almond milk until fully dissolved, then added to your simmering milk:
2-4 Tbsp organic cornstarch
2-4 Tbsp organic flax seed
2 Tbsp organic kuzu root powder
2-4 Tbsp arrow root
2-4 Tbsp tapioca flour
1-2 tsp guar gum
These options can be added directly to the simmering milk and whisked until dissolved:
½-1 tsp agar agar powder
½ -1 tsp xantham gum
1-2 tbsp of gelatin
One final option would be to add a few spoonfuls of either ground or whole chia seeds to the final product before cooling in the refrigerator.
I decided to use some of my Great Lakes Grass-Fed Gelatin for its amazing health properties!
Gelatin has many gut healing properties, may improve sleep, is great for joint health, and can even make your skin more beautiful (hello Mamas)!
As an added bonus, this grass fed version is high in amino acids and naturally thickens whatever you add it to so it is perfect for making spoonable yogurt!
*Please not that gelatin is not suitable for vegans.
Incubating Options:
I have heard of people making yogurt in their ovens by keeping the oven light on, but I am not sure that you would be able to maintain a consistent temperature of 105-115 degrees Fahrenheit long enough to culture.
Other options include a yogurt maker, crockpot, Instant-Pot, or dehydrator. As long as you can maintain this temperature (and not go above 125 degrees which would actually kill your live bacterial cultures), then any of the options above should work!
I have an amazing excalibur dehydrator that my husband contributed to our kitchen gadgets when we got married, and it actually has a yogurt setting.
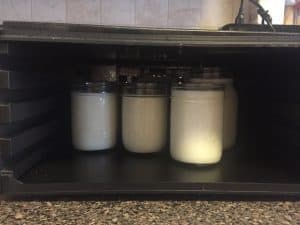
It has worked perfectly for making both raw dairy yogurt as well as this dairy-free version. When I use 8 oz mason jars to make my yogurt, they fit perfectly into the dehydrator and make nice portions for on-the-go snacks with my little people.
You’ll need to incubate your yogurt for anywhere from 12-24 hours (I always go for the full 24 to achieve optimum cultures).
After incubating, your yogurt will appear runny. Do not panic. The yogurt will continue to thicken in the refrigerator for up to 24 hours as it cools.
If you’ve chosen my method of making the yogurt in 4 or 8 oz glass mason jars, you’ll be able to easily move your jars from incubation to the refrigerator for cooling, and even eat straight from the jars! Otherwise, you’ll want to store in the refrigerator in an air-tight container.
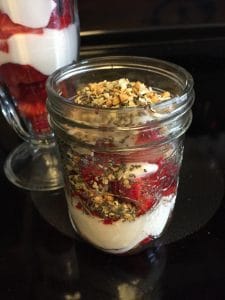
You can add fruit, vanilla, sweeteners, granola, raw honey, or anything else that you’d like to your yogurt but you may find that you like it plain!
How to Make Dairy-Free Yogurt (Vegan, Paleo, and Ketogenic Friendly)
An easy method for making your own yogurt that only requires non-dairy milk, culture, a thickener, and a sweetener of choice (optional). This totally customizable recipe is easy to follow and uses tools you already have in your kitchen.
Ingredients
- 4 cups Dairy-Free Milk (almond, coconut, etc. OR homemade milk)
- 1 tbsp Sweetener (If you are using an unsweetened milk, you will need to add 1 tbsp of a sugar based sweetener such as maple syrup or coconut sugar to feed the fermentation)
- 1-2 tsp Culture (probiotic powder) or 1-2 capsules of probiotics, one package of vegan yogurt starter, or 1/3 cup of a previous batch of vegan yogurt
- 2-4 tpsb Thickener (cornstarch, flaxseed, kuzu root powder, arrowroot, tapioca, guar gum, or any other thickener of choice)
Instructions
-
In a pot over medium heat, bring 3.5 cups of your milk of choice to a gentle simmer. Stir often, watching carefully to make sure that the milk doesn’t burn or scald.
-
Remove milk from heat and cool to 100 degrees Fahrenheit.
-
If you are using agar-agar, xantham gum, or gelatin as your thickener, you would now whisk this into the heated milk while it is cooling.
-
Take the remaining unheated 1/2 cup of milk and gently stir in your culture.
-
If you are using any of the other thickening options, you would also add this to the unheated milk and whisk to ensure there are no clumps.
-
Whisk the unheated, cultured milk into the rest of the milk.
-
Pour yogurt into your yogurt containers, and prepare to incubate using the method of your choice. I prefer to use 8 oz mason jars and culture with the lids on to prevent a thicker layer from forming on the top of each yogurt.
-
Allow to incubate for anywhere from 12-24 hours (I always go for the full 24 to achieve optimum cultures).
-
After incubating, your yogurt will appear runny. Do not panic. The yogurt will continue to thicken in the refrigerator for up to 24 hours as it cools.
-
Store in the refrigerator in an air-tight container.
-
After 24 hours, your yogurt is ready to eat.
-
You can add fruit, vanilla, sweeteners, granola, or anything else that you’d like to your yogurt but you may find that you like it plain!
ENJOY!!!
Did you try this recipe? Which options for milk, sweetener, thickener, and culture did you choose? Post below and let us know!


15 thoughts on “How to Make Dairy-Free Yogurt (Vegan, Paleo, and Ketogenic Friendly)”
Very interesting post. I’m also not a fan of dairy. From my point of view, milk benefits, especially in Western culture, are overestimated.
I made this with Thai brand coconut milk, using 3 TBSP of tapioca starch as a thickening agent. It was perfect! The maple syrup actually gave it enough sweetness for me. I enjoy adding granola, blueberries, and/or banana. Thank you for this recipe. I’ve tried so many, it seems. I have a cashew one that I enjoy, but cashews can get expensive:(.
I’m so glad that you enjoyed the recipe! I love making yogurt with coconut milk too! It is extra creamy and a great subsitute for cashews! 🙂
I will make this work, but this is a flawed recipe. Instructions do not tell you when to add sweetener or probiotics.
I’m sorry you’re having trouble with the recipe. If you look at step 4, it says to add your “culture.” This would be the probiotics. Sweeteners can be added before culturing or as a final step. I hope that helps!
Hey, I was wondering if you could use monk fruit or swerve in the first sweeting step or do the probiotics need the sweetener to feed off of?
Yes, the probiotics do need something to feed off, but it’s a pretty small amount. You could reduce it by half and use monk fruit to sweeten.
So in the recipe description it says to add the thickeners while the milk is simmering, but in the actual recipe it only talks about adding thickener while the milk is cooling. So that is what I did. My thickener (tapioca flour) all went to the bottom and made a clump. I am going to try this again only adding the thickener to the simmering milk. 😊 Hopefully it turns out better.
Also I put the yogurt in 2 pint jars and in one the milk separated and the other didn’t. Any ideas why?
As long as you are making sure it is completely dissolved, it should work either way. I’ve done both. The key is in stirring. The milk may have separated if the thickener wasn’t fully dissolved or if one jar was closer to the heat source. Hopefully those tweaks help for your next batch! Thanks for reading. 🙂
Can I add vanilla extract or other fruits to make it like fruit yogurt?
Yes, I just recommend adding them after you’ve made the yogurt (except for vanilla which can be added when you’re mixing ingredients).
Well this didn’t work for me AT. ALL.
I used almond milk, bought kudzu, bought probiotics that are specifically for non-dairy yogurts- both not cheap, printed the entire post, followed the directions EXACTLY, used my instant pot yogurt setting and I have …
Separated liquid. The solids in the bottom are not gelled either but are completely liquid. What could I have done wrong? I did use homemade almond milk using the Almond cow so there were no preservatives in it…
Hi Libby, I am really sorry that it didn’t work. I have less success with most yogurt recipes in the Instant Pot. I like using either the dehydrator or the oven method best. I also haven’t worked with kudzu as much as other ingredients. I would try a different method or combination of ingredients. Homemade almond milk shouldn’t be a problem!
How long is the yogurt good for? When does it expire?
I usually keep it in the fridge and eat it within a week.